Wednesday, January 27, 2010

German Chocolate Cheesecake


Yes you read that right, German Chocolate Cheesecake! OOOHHH so rich and delicious! I found this recipe on Bake or Break's blog a long time ago and have been waiting to try it. It's awesome! I put parchment paper in my springform pan to make the cheesecake easier to get out.

German Chocolate Cheesecake
October 15th, 2009 · No Comments

Read and see more at Bake or Break. Recipe from Junior’s Cheesecake Cookbook: 50 To-Die-For Recipes for New York-Style Cheesecake.
Cheesecake

* 24 ounces cream cheese, at room temperature
* 1 & 1/3 cups granulated sugar
* 3 tablespoons corn starch
* 1 tablespoon vanilla extract
* 2 large eggs
* 2/3 cup heavy cream


Preheat oven to 350°. Butter the bottom and sides of a 9-inch springform pan. Wrap the outside and the sides of the pan with aluminum foil.

Using a mixer on low speed, beat 8 ounces of cream cheese, 1/3 cup sugar, and cornstarch until creamy (about 3 minutes). Add remaining cream cheese, 8 ounces at a time, scraping the sides of the bowl after each. On medium speed, beat in remaining 1 cup of sugar and vanilla. Add eggs, one at a time, beating well after each. Beat in cream just until blended. Do not overmix.

Spoon the batter into the springform pan. Place pan in a large shallow pan of hot water. Water should come about 1 inch up the sides of the pan. Bake about 1 & 1/4 hours, unitl the edges are light golden brown and the top is slightly golden tan.

Remove pan from water bath and transfer to a wire rack. cool in pan for 2 hours. Cover with plastic wrap and refrigerate about 4 hours. Place in freezer overnight until ready to assemble the cake.
German chocolate cake

* 1 & 1/2 cups sifted cake flour
* 1 teaspoon baking powder
* 1/2 teaspoon baking soda
* 1/2 teaspoon salt
* 4 ounces German sweet chocolate
* 1/3 cup water
* 3/4 cup unsalted butter, at room temperature
* 1 & 1/2 cups granulated sugar
* 3 large eggs, separated
* 1 teaspoon vanilla extract
* 3/4 cup buttermilk
* 1/2 teaspoon cream of tartar


Butter the bottom and sides of two 9-inch round cake pans. Line the bottom of both pans with parchment paper.

Sift flour, baking powder, baking soda, and salt in a small bowl. Melt chocolate in water in the microwave and set aside to cool. Beat butter and sugar on medium speed of an electric mixer. The mixture should be light yellow and creamy. Add egg yolks, one at a time, beating well after each. Mix in melted chocolate and vanilla. Using a wooden spoon, stir in flour mixture, alternating with buttermilk, blending well after each.

Beat egg whites and cream of tartar on high speed until stiff peaks form. Fold about a third of the whites into the chocolate batter, then the remaining whites.

Divide the batter evenly between the two cake pans. Bake about 30 minutes, until a toothpick inserted in the center comes out with a moist crumb. Cool cakes in pans on a wire rack for 15 minutes. Turn onto a cooling rack and peel off paper liners. Let cakes cool completely, about 2 hours. Cover with plastic wrap and refrigerate until ready to assemble the cake.
Coconut frosting

* 1 & 1/2 cups coarsely chopped pecans
* 1/2 cup sliced almonds
* 1/2 cup chopped hazelnuts
* 4 cups flaked coconut, plus extra for sprinkling
* 2 cups granulated sugar
* 2 tablespoons all-purpose flour
* 1 cup heavy cream
* 1 cup milk
* 1 cup unsalted butter, at room temperature
* 1 tablespoon vanilla extract


Preheat oven to 350°. Spread nuts on a large rimmed baking sheet. Toast until golden, about 5 minutes, tossing a couple of times. Set aside to cool.

Toast 1/4 cup of coconut in the same way. Set aside.

Mix sugar and flour in a large saucepan. Add cream, milk, butter, and vanilla. Stir until well combined. Cook, stirring constantly, over medium heat until thick and golden brown, about 12 minutes. Remove from heat and stir in toasted nuts and untoasted coconut. Refrigerate about 30 minutes, until thick enough to spread.
Cake assembly

Remove the cheesecake from freezer and let stand at room temperature for about 10 minutes.

Place one chocolate cake layer, top side down, on a cake plate. Spread with some of the frosting. Remove the springform ring from the cheesecake. Place cheesecake top side down on the forsted cake layer. Spread with frosting. Top with remaining chocolate cake layer, top sie up, and frost the top of the cake and the sides of only the top cake layer with the remaining frosting. Sprinkle top with toasted coconut. Refrigerate at least two hours until ready to serve. Cut cake with a sharp straight-edge knife, not a serrated knife.

Leftover cake can be covered and refrigerated, or wrapped and frozen for up to a month.

Tuesday, January 26, 2010

More bread!


You seriously must try this bread!! http://kerstinskitchen.blogspot.com/2010/01/incredible-no-knead-bread.html

I just made some carrot/currant and apple bread using this same technique. You just substitute carrot juice or apple juice for the water and add currants or apples depending on which bread you're making. & I'm making more pizza and attempting a pizza bread as I type this!

Mexican French Toast


This is my mom's recipe and it a family favorite. I can't even begin to tell you how awesome these are. Just try them! I cut these into strips for a brunch, but we usually have them for breakfast or dinner whole. I usually plan on 2 per person.

Mexican French Toast
Diana Morris

1 dozen flour tortillas
1 dozen eggs
2 dozen strips of bacon cooked
2 large tomatoes, diced
1/2 c green onions, chopped
4 c cheddar cheese, shredded
sour cream
salsa
guacamole (I make it with just avocados, a little salsa, garlic powder and fiesta fajita seasoning)

Beat the eggs in a pie pan. Cook each tortilla individually by dipping it in the egg mixture on both sides and then cooking it in a saute pan or on a flat griddle. Once you've turned the tortilla over in the pan, on the cooked side put 2 strips of bacon a little bit of green onion & cheese. Then fold the sides in and set aside. Repeat with the remaining tortillas, eggs, onions & cheese until all done. Serve with salsa, guac, tomatoes & sour cream.

Coq au Creme


I made this for dinner this past Sunday. It was SO good. It's a little bit of work, but worth it. My friends and I made this dish for a murder mystery dinner when we were in the singles ward. It was one of the first times Matt and I hung out. When he was eating this on Sunday he said he knew he was in love when he tried this that night. Very sweet. I haven't made it since that murder mystery dinner & I have no idea why, it's super good. Instead of adding the flour and water mixture I just let it simmer uncovered until it thickened.

Coq au Creme
www.allrecipes.com

3 tablespoons olive oil
1 large onion, chopped
2 cloves garlic, minced
2 tablespoons butter
4 skinless, boneless chicken
breast halves
salt and pepper to taste 1 teaspoon dried rosemary
2 (4.5 ounce) cans sliced
mushrooms, drained
1 1/2 cups chicken broth
1 (16 ounce) container sour
cream, room temperature
1 tablespoon all-purpose flour

Directions
1 Heat oil in a large skillet over medium heat. Add onion
and garlic and saute until slightly clear, then reduce
heat to medium low (careful not to burn, but browning is okay).
2 Meanwhile, melt butter or margarine in another large
skillet over medium high heat. Rinse chicken breasts and pat
dry; season with salt and pepper to taste and brown on both
sides, about 2 minutes each side.
3 Drain and add browned chicken breasts to onion/garlic
mixture, then add rosemary, mushrooms and chicken broth. Stir
to mix together, making sure chicken breasts are evenly
spaced in the skillet. Reduce heat to simmer, cover skillet
tightly and cook for 30 minutes.
4 Add sour cream and stir well, breaking up any clumps
with a spoon. Cover skillet again and allow to heat through
for 10 minutes.
5 Strain about 3/4 cup of the liquid from the skillet
into a small bowl; add flour and mix well with a fork to
break up any clumps. Pour mixture into the chicken mixture,
stir well and cook over medium heat for about 15 to 20 more
minutes to thicken the sauce. Serve hot.

Crustless Quiche


Matt really likes quiche, but he doesn't like the crust (weird, I know), so when I found this recipe on allrecipes.com I knew I had to try it. It was super good and very easy. I used fresh baby spinach that I sauteed with the onions instead of frozen.

Crustless Spinach Quiche


www.allrecipes.com

1 tablespoon vegetable oil
1 onion, chopped
1 (10 ounce) package frozen chopped
spinach, thawed and drained

5 eggs, beaten
3 cups shredded Muenster cheese
1/4 teaspoon salt
1/8 teaspoon ground black pepper
Directions:
1. Preheat oven to 350 degrees F (175 degrees C). Lightly grease a 9 inch pie pan.
2. Heat oil in a large skillet over medium-high heat. Add onions and cook, stirring occasionally, until onions are soft. Stir in spinach and continue cooking until excess moisture has evaporated.
3. In a large bowl, combine eggs, cheese, salt and pepper. Add spinach mixture and stir to blend. Scoop into prepared pie pan.
4. Bake in preheated oven until eggs have set, about 30 minutes. Let cool for 10 minutes before serving.

Lemon Bluberry Muffins


I made these muffins from Sister's Cafe last week for a brunch. They were really good.

Grandma's Blueberry Lemon Muffins
submitted by Brittany

2 cups flour
1/2 cup sugar
3 tsp baking powder
1/2 tsp salt
zest of one lemon
1 egg
1 cup milk
1/2 cup shortening (or butter*)
1 cup frozen blueberries

Topping (this makes extra - you can try cutting it down if you want):
1/2 cup butter, melted
1 Tb lemon juice
1/2 cup sugar
Mix dry ingredients and set aside. Beat eggs, milk and shortening. Stir in blueberries. Add dry ingredients and stir gently to combine. Bake at 375 degrees for 20-25 minutes. Combine butter and lemon juice. While the muffins are still warm, dip the tops in the butter and lemon juice, then dip in sugar. Makes 12 muffins. *I substitute butter because I love the taste! It works great either way.

Saturday, January 16, 2010

Bread everywhere!


I've turned my kitchen into a bakery!! Seriously, I've always wanted to learn how to make bread and this book Matt got me by Jim Lahey has changed my life!! I blogged about it a few posts ago. In the past week I've made 4 regular round loaves of bread, a kalamata olive loaf, baguettes and a pizza bread! Really he teaches you how to let the bread make it self, you just mix for about 20 second and give it a lot of time to rise and do it's thing. I'm seriously so amazed.

The recipe I posted previously is one I saw online, but it's a little different than his in the book, so I will repost the correct recipe soon. If anyone is interested in learning his technique please let me know. I'm happy to share this new found joy!!

Almost Peanut Butter Sandwich cookies


I'm learning to adjust being a mom to 3 kids, but some days are just nuts! Madeline wanted to make cookies a few days ago, so I decided to try this peanut butter sandwich cookie from Our Best Bites blog that I've been wanting to try for a long time. I started making them at 11 am & by 6 pm I finally had all the cookies baked and the filling was not even started. It was a crazy day of going from one crying child to the next. So I decided to nix the filling. The cookies were delicious as is. Someday I will try again and make the filling!

Peanut Butter Sandwich Cookies
Click to print text only

1 C butter flavored Crisco
1 C creamy peanut butter (preferably the kind without salmonella)
1 C sugar
1 C packed brown sugar
1 t vanilla
3 eggs
3 C flour
2 t baking soda
1/2 t salt

filling:
1 C creamy peanut butter
1/2 c real butter, softened
4 C powdered sugar
2 t vanilla
5-6 T milk

For the cookies:
Preheat oven to 375 degrees.
Cream shortening, peanut butter, and sugars together until light and fluffy (about 2 minutes). Add in vanilla, and eggs one at a time. In a separate bowl whisk together flour, baking soda, and salt and add to dough. Mix to combine. The dough will be very soft- that's normal!

You know the drill. Roll into balls, roll in sugar, place on cookie sheet (no need to grease it) and do the little forky criss-cross thing.

Okay, so pop the cookies into the oven and bake for 6-7 minutes. You want them to say super soft, so don't let them get brown. In my oven, and for the size of cookies I do, 6 minutes exactly is perfect. Remove them from pan and cool on a cooling rack.

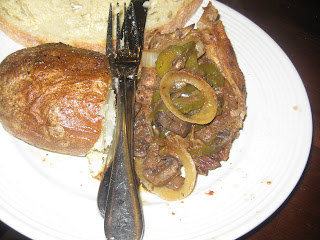
Crockpot peppercorn steak


I tried this steak recipe from http://crockpot365.blogspot.com/. It was easy and delicious. I'm starting to really appreciate what you can make in a crockpot!

Peppercorn Steak

--4 to 6 steaks (use whatever is on sale, it's going to tenderize nicely in the crock; don't buy expensive meat.)
--1 cup tomato sauce
--1/2 cup Worcestershire sauce (Lea Perrins is GF)
--1/4 cup of water
--2 chopped bell peppers (I used one yellow, one green)
--1 chopped yellow onion
--8 oz sliced mushrooms
--1 T Italian seasoning
--1/4 t black pepper

The Directions.

Put the meat in the crockpot; mine was still frozen solid. Cover with the chopped vegetables. Pour in the tomato sauce, Worcestershire, and water. Add the Italian seasoning and black pepper.

No need to stir.

Cover and cook on low for 7-9 hours, or on high for 4-6.

Thursday, January 14, 2010

Asian Noodle Salad


I saw this recipe on a bunch of blogs a long time ago and finally got around to trying it. It's a really light, refreshing and delicious salad. From what I can see it looks like it was originally Pioneer Woman's recipe and a lot of people have adapted her recipe (http://thepioneerwoman.com/cooking/2008/03/my_most_favorite_salad_ever_ever_ever_ever/). Every recipe I've tried of hers has been amazing. I didn't have all the veggies she suggested, so I left out the sprouts and all the colors of bell peppers. I just used green ones. I didn't have cashews so I substituted almonds. I didn't have jalapenos so I didn't add those either.

Asian Noodle Salad

Added by Ree Drummond on July 11, 2009 in Pasta Salads, Salads
Prep Time 30 Minutes
Cook Time 10 Minutes Servings 6 Difficulty Easy
Ingredients

* SALAD INGREDIENTS:
* 1 package Linguine Noodles, Cooked, Rinsed, And Cooled
* ½ heads Sliced Napa Cabbage, Or More To Taste
* ½ heads Sliced Purple Cabbage, Or More To Taste
* ½ bags Baby Spinach, Or More To Taste
* 1 whole Red Bell Pepper, Sliced Thin
* 1 whole Yellow Bell Pepper, Sliced Thin
* 1 whole Orange Bell Pepper, Thinly Sliced
* 1 bag Bean Sprouts (also Called Mung Bean Sprouts)
* Chopped Cilantro, Up To 1 Bunch, To Taste
* 3 whole Scallions, Sliced
* 3 whole Cucumbers Peeled And Sliced
* 1 can (about 10 Oz.) Whole Cashews, Lightly Toasted In Skillet
* _____
* FOR THE DRESSING:
* 1 whole Lime, Juiced
* 8 Tablespoons Olive Oil
* 8 Tablespoons Soy Sauce
* 2 Tablespoons (up To 3 Tablespoons) Sesame Oil
* ⅓ cups Brown Sugar
* 3 Tablespoons Fresh Ginger Chopped
* 2 cloves Garlic Chopped
* 2 whole Hot Peppers Or Jalapeno's, Chopped
* Chopped Cilantro

Preparation Instructions

Mix salad ingredients together. Whisk dressing ingredients together and pour over salad. Mix with tongs or hands and serve on a platter.

Note: dressing keeps for up to three days before serving, without cilantro.

INCREDIBLE NO KNEAD BREAD


Matt got me a book for Christmas called, My bread, the revolutionary no-work, no-knead method by Jim Lahey. The idea of bread that you don't have to knead that is also no work is VERY appealing to me. This bread is seriously AMAZING! Crusty crust and moist chewy center. The only thing is you have to plan ahead! It rises twice. The first time for 12-18 hours and the second time for 1-2 hours. You must try this method! I cooked the bread in a dutch oven.

No-Knead Bread
Jim Lahey at the Sullivan Street Bakery via Mark Bittman at New York Times

Yields one 1 1/2 pound loaf

3 cups bread flour, more for dusting
1/4 teaspoon rapid rise, instant yeast
1 1/4 teaspoons salt
1 1/2 c cool water
Cornmeal or wheat bran as needed.

1. In a large bowl combine flour, yeast and salt. Add water, and stir until blended; dough will be sticky. Add a little more water if you need to make it sticky. Cover bowl with plastic wrap. Let dough rest at least 12 hours, preferably about 18, at room temperature, out of sunlight, about 70 degrees.

2. Dough is ready when its surface is dotted with bubbles and it's a little bit darker of a color. Use lightly floured hands to pull the dough off the edges of the bowl and tuck the edges in to make it a round ball. Make sure there is a light coating of flour all over the ball of dough, not too much, just enough so you can pick it up without the dough sticking to your hands.

3. Generously coat a cotton towel (not terry cloth) with flour, wheat bran or cornmeal; put dough seam side down on towel and dust with more flour, bran or cornmeal. Fold towel over to cover dough and put it in a draft free place to rise. Let it rise for 1-2 hours. When it is ready, dough will be doubled in size and will not readily spring back when poked with a finger.

4. A half-hour before dough is ready, heat oven to 475°. Put a 6- to 8-quart heavy covered pot (cast iron, enamel, Pyrex or ceramic) in oven as it heats. When dough is ready, carefully remove pot from oven. Slide your hand under towel and turn dough over into pot, seam side up; it may look like a mess, but that is O.K. Shake pan once or twice if dough is unevenly distributed; it will straighten out as it bakes. Cover with lid and bake 30 minutes, then remove lid and bake another 15 to 30 minutes (I ended up only baking mine 10 minutes extra), until loaf is beautifully browned. Cool on a rack.

Brown Sugar Chicken


There is a new blog that I LOVE, it's http://crockpot365.blogspot.com. That woman can do some incredible things with a crockpot! I'm really getting into crockpot cooking now that I have 3 kids. This is the first recipe of hers that I've tried. It was really easy and really good. It's not something I would make all the time since it has so much sugar, but in a pinch it was great. I served it with rice, veggies and fruit.

Brown Sugar Chicken

--12 boneless, skinless chicken thighs, or 6 boneless, skinless breast halves
--1 cup brown sugar (it's okay. you can brush your teeth after.)
--1/4 cup lemon-lime soda (stay with me...)
--2/3 cup vinegar (I used white wine, but think regular white would be fine)
--3 cloves smashed and chopped garlic
--2 T soy sauce (La Choy and Tamari wheat free are GF)
--1 tsp ground black pepper

The Directions.

Use a 4 quart crockpot for this recipe.

Plop the chicken into your crockpot. Cover with the brown sugar, pepper, chopped garlic, and soy sauce. Add the vinegar, and pour in the soda. It will bubble!

Cover and cook on low for 6-9 hours, or on high for 4-5. The chicken is done when it is cooked through and has reached desired consistency. The longer you cook it, the more tender it will be.

Serve over a bowl of white rice with a ladle full of the broth.

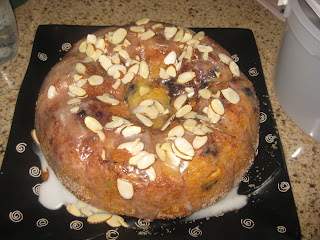
Blueberry Almond Pound Cake


My friend Diane made this SUPER delicious cake for a cooking club we were a part of awhile ago. I had a bunch of frozen blueberries I needed to use and remembered how delicious this cake was so I made it. It was as good as I remembered it! I didn't have a cake mix that called for butter, so I used a regular yellow cake mix that calls for oil. I also don't have a tube pan, so I used a bundt pan and it turned out great!


Blueberry Almond Pound Cake

Made by: Diane Larsen

1 package butter-flavored cake mix

8 oz cream cheese

½ c vegetable oil

3 eggs

1 t almond extract

2 c frozen blueberries

Preheat oven to 325 degrees. Lightly grease and flour a 10 inch tube pan. Combine cake mix, cream cheese, oil, eggs and almond extract. Beat until very smooth. Gently fold in blueberries. Spoon into prepared tube pan and bake for about 1 hour, until a toothpick comes out clean when inserted into the center. Remove from oven, let cool about 5 mins, then invert onto a serving plate. Glaze (if desired) while still warm, but not hot.

Optional glaze:

Mix 1 ½ cups of powdered sugar with cold water, adding 1 T water at a time until a thin but not runny consistency. Add ½ t almond extract. Stir well until all powdered sugar is blended smoothly. Sprinkle top of cake with sliced almonds, then drizzle the glaze all over the almonds and cake.

Tortilla Soup and Taquitos


I LOVE tortilla soup. It's one of my favorite things to get at Mexican restaurants. I've been on a quest to learn to make good tortilla soup. For my first try this turned out really good. I used my friend Tracy's recipe. She's a great cook. I ended up adding probably double or triple the amount of chilies she calls for, so you can do that to your taste, and I added a can of stewed tomatoes to the blender with the chilies. I also didn't add the tortillas to the broth while it was cooking.

I saw the taquitos made on Paula Dean's show. They were really good.

Tracy's Tortilla soup:

Puree 2 (seeded/soaked) ancho chiles, 1 onion, 2 tomatoes and 2 cloves of garlic in a blender. Fry in 2T oil for 4-5 minutes (until garlic is fragrant). In soup pot, bring 6 cups (can increase depending on servings intended) to a boil. Add 4 torn corn tortillas (again, increase if you are upping the liquid), rotisserie chicken (shredded) and 1/2 cup cilantro, simmer until tortillas break up and thicken soup. Add in chile mixture. Add salt to taste. Garnish with crisp tortilla strips, mexican cheese, avacado slices, cilantro and lime wedges.

Crispy Fried Tacos

Recipe courtesy Patricia Jinich

Prep Time:
45 min
Inactive Prep Time:
--
Cook Time:
1 hr 20 min

Level:
Easy

Serves:
10 servings

Ingredients

* 4 pounds chicken breasts, with skin and bones
* 5 garlic cloves, smashed
* 2 tablespoons kosher salt
* 2 pounds Roma tomatoes, skinned
* 2 whole cloves (I didn't add)
* 8 black peppercorns
* 1/2 cup roughly chopped white onion
* 2 tablespoons corn or safflower oil, plus canola oil, for frying
* 2 bay leaves
* 3/4 cup heavy cream
* 1/4 cup bread crumbs (I didn't add)
* 10 corn tortillas, heated
* Wooden toothpicks
* 1/2 cup chopped cilantro, for garnish
* Salsa Verde Pueblera, recipe follows, for dipping

Directions

Rinse chicken breast in cold water and add to a large pot. Cover with water and add 4 smashed garlic cloves and 1 tablespoon of salt. Bring to a boil over medium heat. Reduce the heat and simmer, uncovered, until chicken is cooked through, about 25 minutes. Drain and transfer to a large bowl. Shred the chicken when it is cool enough to handle. Set aside 4 cups of chicken.

Put the tomatoes in a large pot and cover with water. Bring to a boil, then reduce the heat and simmer until cooked through and soft, about 15 minutes. Transfer the tomatoes to a blender along with the remaining tablespoon of salt, whole cloves, peppercorns, white onion and remaining garlic clove. Puree until smooth.

Add 2 tablespoons of corn oil to a large pan, over medium-high heat. Once hot, add the tomato puree, bay leaves and the shredded chicken and stir. Simmer until the mixture has thickened, about 10 minutes. Stir in the cream and bread crumbs and simmer until mixture has thickened again, about 4 to 5 more minutes. Mixture will be moist but not too wet, which will be perfect for filling the tacos.

Preheat the canola oil in a deep-fryer to 350 degrees F.

Heat the tortillas on a hot comal or dry skillet over medium heat for a minute. This will prevent them from breaking when rolling into a taco. Put 1 to 2 tablespoons of the filling on each tortilla and roll.

You can insert wooden toothpicks through 2 tacos at a time, so they will fry evenly and hold their shape. Once the oil is hot, dip the taco pairs in the hot oil. Fry until the tacos have crisped and gained a golden color, about 2 to 3 minutes. You may want to flip for another minute to the other side. Remove from the oil and put on a plate or tray covered with paper towels. Arrange the tacos on a serving platter and garnish with cilantro.

Serve alongside Salsa Verde Pueblera.

Cook's Note: If you don't want to fry the tacos, roll them, and toast them over a hot comal or dry skillet. Toast and turn until they are crisp enough to your liking. It will take about 5 minutes per side.

A viewer, who may not be a professional cook, provided this recipe. The Food Network Kitchens chefs have not tested this recipe and therefore, we cannot make representation as to the results.

Tuesday, January 12, 2010

Angel Whispers


These cookies are a little time consuming, but so so good. They're light and flaky with a creamy lemon filling.

Angel Whispers
Submitted by: Julie
www.allrecipes.com
INGREDIENTS:
1 cup butter
1/2 cup confectioners' sugar
2 cups all-purpose flour
1 teaspoon lemon zest
1/2 teaspoon salt


1 egg, beaten
2/3 cup white sugar
1 1/2 teaspoons lemon zest
3 tablespoons lemon juice
1 1/2 tablespoons butter
DIRECTIONS:
1. In a medium bowl, cream together butter and confectioners' sugar until light. Stir in the lemon peel, flour and salt. Cover bowl, and chill for about 1 hour.
2. Preheat oven to 400 degrees F (200 degrees C).
3. Flatten teaspoons of dough onto cookie sheets, and bake for 5 to 8 minutes, until light brown. Remove from baking sheets to cool on racks.
4. To make the filling, combine the beaten egg, sugar, lemon zest, lemon juice and butter in the top of a double boiler. Stir until thick. Sandwich cookies with 1 teaspoon of filling.

Hummus


Homemade Hummus...YUM!

Hummus III

www.allrecipes.com

Ready In: 10 Minutes
Servings: 16
"As a spread, dip or garlicky pita filling, classic hummus is both delicious and satisfying. Best of all, it's whipped up in seconds in a blender or food processor."
Ingredients:
2 cups canned garbanzo beans, drained
1/3 cup tahini
1/4 cup lemon juice
1 teaspoon salt

2 cloves garlic, halved
1 tablespoon olive oil
1 pinch paprika
1 teaspoon minced fresh parsley
Directions:
1. Place the garbanzo beans, tahini, lemon juice, salt and garlic in a blender or food processor. Blend until smooth. Transfer mixture to a serving bowl.
2. Drizzle olive oil over the garbanzo bean mixture. Sprinkle with paprika and parsley.